ShopDreamUp AI ArtDreamUp
Deviation Actions


Suggested Deviants


Suggested Collections


You Might Like…


Description
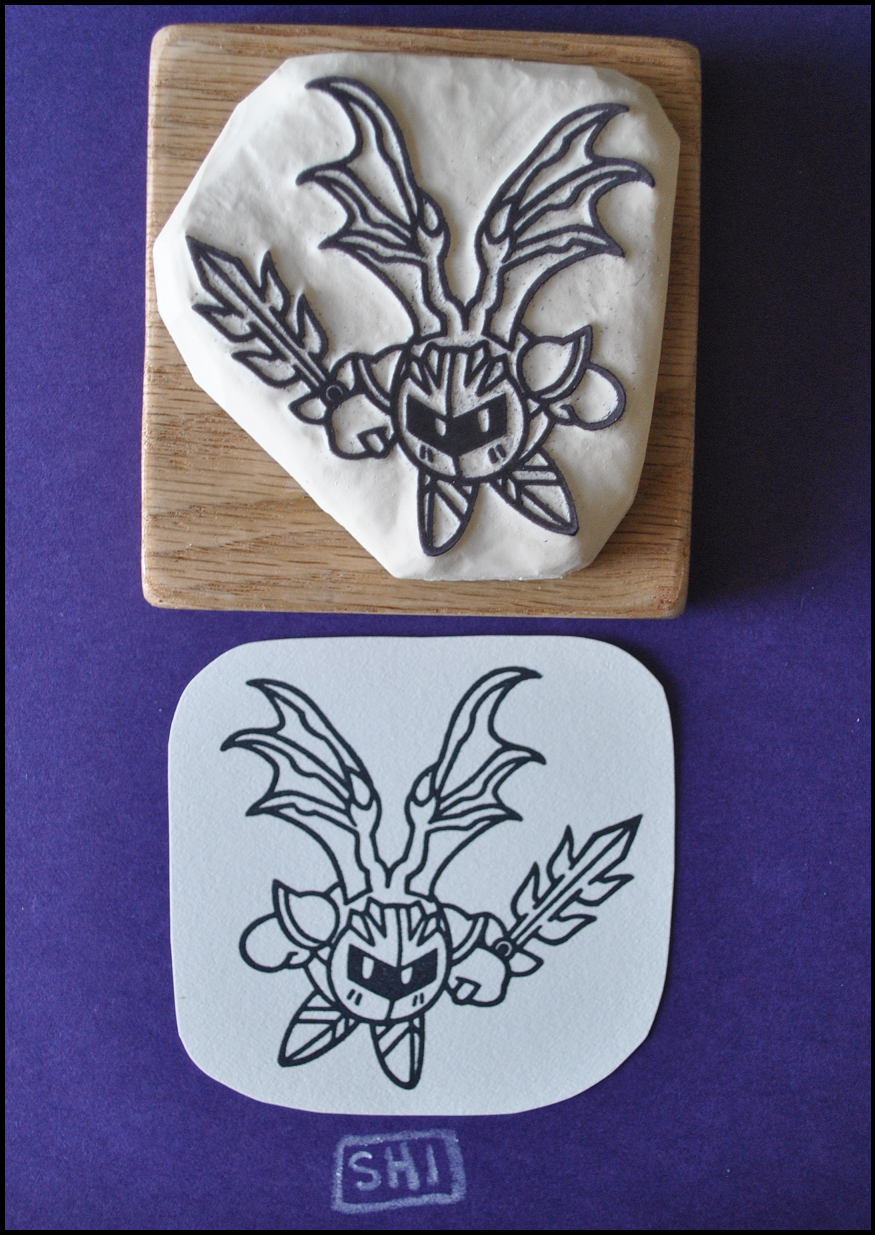
A stamp of Meta Knight that I drew and carved!  requested a stamp-making tutorial, so I tried my best to put one together.
Disclaimer:
There are many different ways to carve rubber stamps (especially depending on the style of the image)! This is just the way I do them! Also, you are handling sharp tools and focusing close-up on objects for a long time, so take many breaks and please don't hurt yourself!
Here is the link to my Photobucket gallery containing all of the pictures here: [link]
MATERIALS
[link] I use Speedball Speedy-Cut rubber for my stamps. It isn't super pro quality, but it's what's affordable and available to me.
[link] You can buy a generic pack of carving tools at Micheals. The brush, the wooden stick, and the thin needle tool are the ones I use most of the time (and are not in a carving tool pack). The needle tool is actually for clay-molding, so you will probably find one in a clay-molding pack. I use this tool for nearly all of my carving, so it is very important. The wooden stick is actually a cuticle stick with the tips sanded down blunt and smooth. It is used to smooth down the roughness of the carving cuts. The brush is used to sweep away the dust when you are carving. The colored fine point sharpie is used to make corrections to the image (last-minute fixes to mistakes you didn't notice).
[link] A plank of oak wood and mounting cushion are used for mounting the stamp. You can get the wood at a hardware store, and you can buy the mounting cushion at [link] .
PRINTING TO RUBBER
[link] Draw your picture on paper. Go over your lines really hard with pencil.
[link] Cut out your drawing and put tape (I use packing tape) on the back of it. Tape it down to the rubber (the surface of the rubber often has imperfections, so make sure you chose a nice smooth spot!).
[link] Rub down the drawing firmly (I use the eraser end of my tablet pen) for a few minutes. You can lift up a corner to check and see if it printed dark enough (if not, keep rubbing it more). Remove the drawing, and carbon print will be there!
[link] Cut out around the image with a short knife. (I use the extra rubber chunks as erasers!)
CARVING!
For lighting, it's best to have natural like coming in from your left side.
[link] [link] I like to start with the outer outline of the image. Moving from left to right for the first few strokes, lightly trace around the black carbon line. This will create a fine white line, which will serve as a "starting groove" to make deeper cuts. Make the deeper cuts not too deep or not too shallow; you have to feel your way around this. Make sure to keep the needle angled away from the carbon lines, because you do not want to "undercut" them (you want your carved lines to have a gentle slope). Using this technique, go around the entire outer outline of the drawing.
[link] The outline is done! I also made a correction with my orange fine point sharpie. When you do this, make sure to dot your sharpie and not to drag it.
[link] Now to start the inside lines! Trace around the lines like you would for the outer outline. In order to clear out the white negative space, I segment it by carving extra "dividing lines". Angle your needle nearly against (watch and make sure you don't damage your carbon lines) your stamp and cut underneath where you just made the dividing line (rubbing back and forth). Stop before you get to close to your carved lines. To finish, go over the inner lines you just carved and try to pop out the negative white space. Here are more pictures of this technique: [link] [link]
[link] When you clear it out, it usually is a bit rough-looking. Smooth it out with the cuticle stick (pointed end, not sloped end), moving in small circles. For areas that are too small to be smoothed out with the stick, use you needle in the same way. To smooth out the slopes/ edges of your carved lines, gently rub the side of the needle against it.
The techniques I just explained are literally the only ones I use for all of my carving! It just a matter of accurately controlling them. The key is to use light pressure and many, many strokes. And take a lot of breaks, or you will hurt yourself!
Progress shots: [link] [link] [link] [link]
[link] [link] Now to clear out the negative space around the stamp! Use the big semi-circle-curved carving tool to carve out big chunks. Use same shaped smaller tool to clear out smaller sections. [link] [link] Use the knife-tip carving tool to shave down some of the roughness. Keep in mind that it is very easy to slip and run these tools straight into your carved lines, so go slowly and carefully!!
[link] Now to clear out the negative space still stuck to the side of your outer lines. Move you needle back and forth, cutting underneath the white area. [link] Then go around the other side and gently try to pop it off. Do this for the entire stamp.
[link] All there is left is to smooth the outer area of the stamp! Rub, rub, rub the cuticle stick around it until it's all smoothed down. [link]
STAMP MOUNTING
[link] Mark the cutting line on your piece of wood. Then I go cut this line with a jigsaw, and sand down the edges with and electric sander. Put a coat or two of polyurethane on the wooden block.
[link] Trace around your stamp on the mounting cushion. Cut it out. [link] Stick it to the back of you stamp. Peel of the other side and stick it to the wood block. [link]
AND YOU'RE DONE! [link] To care for your stamp: Use acid free stamp pads. After stamping, gently pat it with a damp paper towel (cloth tends to build up fibers in the stamp). Store carved side up in a cool, dark, dry place. And have fun with it!!
Please feel free to ask me any questions! And Merry Christmas everybody!!
requested a stamp-making tutorial, so I tried my best to put one together.Disclaimer:
There are many different ways to carve rubber stamps (especially depending on the style of the image)! This is just the way I do them! Also, you are handling sharp tools and focusing close-up on objects for a long time, so take many breaks and please don't hurt yourself!
Here is the link to my Photobucket gallery containing all of the pictures here: [link]
MATERIALS
[link] I use Speedball Speedy-Cut rubber for my stamps. It isn't super pro quality, but it's what's affordable and available to me.
![[link]](https://www.deviantart.com/users/outgoing?http://img.photobucket.com/albums/v371/Shimitaro/WALKTHROUGH/step2_zpsd50724df.jpg)
[link] You can buy a generic pack of carving tools at Micheals. The brush, the wooden stick, and the thin needle tool are the ones I use most of the time (and are not in a carving tool pack). The needle tool is actually for clay-molding, so you will probably find one in a clay-molding pack. I use this tool for nearly all of my carving, so it is very important. The wooden stick is actually a cuticle stick with the tips sanded down blunt and smooth. It is used to smooth down the roughness of the carving cuts. The brush is used to sweep away the dust when you are carving. The colored fine point sharpie is used to make corrections to the image (last-minute fixes to mistakes you didn't notice).
![[link]](https://www.deviantart.com/users/outgoing?http://img.photobucket.com/albums/v371/Shimitaro/WALKTHROUGH/step1_zpsa775d1ed.jpg)
[link] A plank of oak wood and mounting cushion are used for mounting the stamp. You can get the wood at a hardware store, and you can buy the mounting cushion at [link] .
![[link]](https://www.deviantart.com/users/outgoing?http://img.photobucket.com/albums/v371/Shimitaro/WALKTHROUGH/Step3_zps1cd7a4cc.jpg)
PRINTING TO RUBBER
[link] Draw your picture on paper. Go over your lines really hard with pencil.
![[link]](https://www.deviantart.com/users/outgoing?http://img.photobucket.com/albums/v371/Shimitaro/WALKTHROUGH/Step4_zpse9438391.jpg)
[link] Cut out your drawing and put tape (I use packing tape) on the back of it. Tape it down to the rubber (the surface of the rubber often has imperfections, so make sure you chose a nice smooth spot!).
![[link]](https://www.deviantart.com/users/outgoing?http://img.photobucket.com/albums/v371/Shimitaro/WALKTHROUGH/Step5_zps833a359f.jpg)
[link] Rub down the drawing firmly (I use the eraser end of my tablet pen) for a few minutes. You can lift up a corner to check and see if it printed dark enough (if not, keep rubbing it more). Remove the drawing, and carbon print will be there!
![[link]](https://www.deviantart.com/users/outgoing?http://img.photobucket.com/albums/v371/Shimitaro/WALKTHROUGH/Step6_zps986ba7b2.jpg)
[link] Cut out around the image with a short knife. (I use the extra rubber chunks as erasers!)
![[link]](https://www.deviantart.com/users/outgoing?http://img.photobucket.com/albums/v371/Shimitaro/WALKTHROUGH/Step7_zpsb5acf92c.jpg)
CARVING!
For lighting, it's best to have natural like coming in from your left side.
[link] [link] I like to start with the outer outline of the image. Moving from left to right for the first few strokes, lightly trace around the black carbon line. This will create a fine white line, which will serve as a "starting groove" to make deeper cuts. Make the deeper cuts not too deep or not too shallow; you have to feel your way around this. Make sure to keep the needle angled away from the carbon lines, because you do not want to "undercut" them (you want your carved lines to have a gentle slope). Using this technique, go around the entire outer outline of the drawing.
![[link]](https://www.deviantart.com/users/outgoing?http://img.photobucket.com/albums/v371/Shimitaro/WALKTHROUGH/Step8_zps7c0bbb76.jpg)
![[link]](https://www.deviantart.com/users/outgoing?http://img.photobucket.com/albums/v371/Shimitaro/WALKTHROUGH/Step9_zps204fbb96.jpg)
[link] The outline is done! I also made a correction with my orange fine point sharpie. When you do this, make sure to dot your sharpie and not to drag it.
![[link]](https://www.deviantart.com/users/outgoing?http://img.photobucket.com/albums/v371/Shimitaro/WALKTHROUGH/Step10_zps67f2d42e.jpg)
[link] Now to start the inside lines! Trace around the lines like you would for the outer outline. In order to clear out the white negative space, I segment it by carving extra "dividing lines". Angle your needle nearly against (watch and make sure you don't damage your carbon lines) your stamp and cut underneath where you just made the dividing line (rubbing back and forth). Stop before you get to close to your carved lines. To finish, go over the inner lines you just carved and try to pop out the negative white space. Here are more pictures of this technique: [link] [link]
![[link]](https://www.deviantart.com/users/outgoing?http://img.photobucket.com/albums/v371/Shimitaro/WALKTHROUGH/Step11_zps72c70920.jpg)
![[link]](https://www.deviantart.com/users/outgoing?http://img.photobucket.com/albums/v371/Shimitaro/WALKTHROUGH/Step13_zps5ba6fed0.jpg)
![[link]](https://www.deviantart.com/users/outgoing?http://img.photobucket.com/albums/v371/Shimitaro/WALKTHROUGH/Step14_zpsd110fab3.jpg)
[link] When you clear it out, it usually is a bit rough-looking. Smooth it out with the cuticle stick (pointed end, not sloped end), moving in small circles. For areas that are too small to be smoothed out with the stick, use you needle in the same way. To smooth out the slopes/ edges of your carved lines, gently rub the side of the needle against it.
![[link]](https://www.deviantart.com/users/outgoing?http://img.photobucket.com/albums/v371/Shimitaro/WALKTHROUGH/Step12_zpsd5cfedae.jpg)
The techniques I just explained are literally the only ones I use for all of my carving! It just a matter of accurately controlling them. The key is to use light pressure and many, many strokes. And take a lot of breaks, or you will hurt yourself!
Progress shots: [link] [link] [link] [link]
![[link]](https://www.deviantart.com/users/outgoing?http://img.photobucket.com/albums/v371/Shimitaro/WALKTHROUGH/Step15_zpsa4ab644b.jpg)
![[link]](https://www.deviantart.com/users/outgoing?http://img.photobucket.com/albums/v371/Shimitaro/WALKTHROUGH/Step16_zps24ab5094.jpg)
![[link]](https://www.deviantart.com/users/outgoing?http://img.photobucket.com/albums/v371/Shimitaro/WALKTHROUGH/Step17_zps51229d7a.jpg)
![[link]](https://www.deviantart.com/users/outgoing?http://img.photobucket.com/albums/v371/Shimitaro/WALKTHROUGH/Step18_zpsc9a72c83.jpg)
[link] [link] Now to clear out the negative space around the stamp! Use the big semi-circle-curved carving tool to carve out big chunks. Use same shaped smaller tool to clear out smaller sections. [link] [link] Use the knife-tip carving tool to shave down some of the roughness. Keep in mind that it is very easy to slip and run these tools straight into your carved lines, so go slowly and carefully!!
![[link]](https://www.deviantart.com/users/outgoing?http://img.photobucket.com/albums/v371/Shimitaro/WALKTHROUGH/Step19_zps0f1998f4.jpg)
![[link]](https://www.deviantart.com/users/outgoing?http://img.photobucket.com/albums/v371/Shimitaro/WALKTHROUGH/Step20_zpsae4199e3.jpg)
![[link]](https://www.deviantart.com/users/outgoing?http://img.photobucket.com/albums/v371/Shimitaro/WALKTHROUGH/Step21_zpsbaa770b8.jpg)
![[link]](https://www.deviantart.com/users/outgoing?http://img.photobucket.com/albums/v371/Shimitaro/WALKTHROUGH/Step22_zpsc0147db8.jpg)
[link] Now to clear out the negative space still stuck to the side of your outer lines. Move you needle back and forth, cutting underneath the white area. [link] Then go around the other side and gently try to pop it off. Do this for the entire stamp.
![[link]](https://www.deviantart.com/users/outgoing?http://img.photobucket.com/albums/v371/Shimitaro/WALKTHROUGH/Step23_zpsa499bd09.jpg)
![[link]](https://www.deviantart.com/users/outgoing?http://img.photobucket.com/albums/v371/Shimitaro/WALKTHROUGH/Step24_zps3e0183e0.jpg)
[link] All there is left is to smooth the outer area of the stamp! Rub, rub, rub the cuticle stick around it until it's all smoothed down. [link]
![[link]](https://www.deviantart.com/users/outgoing?http://img.photobucket.com/albums/v371/Shimitaro/WALKTHROUGH/Step25_zps11384267.jpg)
![[link]](https://www.deviantart.com/users/outgoing?http://img.photobucket.com/albums/v371/Shimitaro/WALKTHROUGH/Step26_zpsfd140731.jpg)
STAMP MOUNTING
[link] Mark the cutting line on your piece of wood. Then I go cut this line with a jigsaw, and sand down the edges with and electric sander. Put a coat or two of polyurethane on the wooden block.
![[link]](https://www.deviantart.com/users/outgoing?http://img.photobucket.com/albums/v371/Shimitaro/WALKTHROUGH/Step27_zps6c3083a8.jpg)
[link] Trace around your stamp on the mounting cushion. Cut it out. [link] Stick it to the back of you stamp. Peel of the other side and stick it to the wood block. [link]
![[link]](https://www.deviantart.com/users/outgoing?http://img.photobucket.com/albums/v371/Shimitaro/WALKTHROUGH/Step28_zpsd6fbcc06.jpg)
![[link]](https://www.deviantart.com/users/outgoing?http://img.photobucket.com/albums/v371/Shimitaro/WALKTHROUGH/Step29_zps1e4bdf16.jpg)
![[link]](https://www.deviantart.com/users/outgoing?http://img.photobucket.com/albums/v371/Shimitaro/WALKTHROUGH/Step30_zps79202adc.jpg)
AND YOU'RE DONE! [link] To care for your stamp: Use acid free stamp pads. After stamping, gently pat it with a damp paper towel (cloth tends to build up fibers in the stamp). Store carved side up in a cool, dark, dry place. And have fun with it!!
![[link]](https://www.deviantart.com/users/outgoing?http://img.photobucket.com/albums/v371/Shimitaro/WALKTHROUGH/Step31_zps01f07735.jpg)
Please feel free to ask me any questions! And Merry Christmas everybody!!
Image size
875x1235px 1.94 MB
© 2012 - 2024 Kojireru
Comments10
Join the community to add your comment. Already a deviant? Log In
Can I buy the stamp, please?